
Ecommerce enables businesses and entrepreneurs to sell products or services directly to customers online. Building an online store from scratch requires technical skills and resources that not everyone has access to. This is where WooCommerce comes in – it provides a robust ecommerce solution for WordPress users without needing to code everything yourself.
WooCommerce is a free, open source WordPress plugin that allows you to leverage the power of WordPress to create a fully-featured online store. With over 5 million active installs, it is by far the most popular ecommerce platform integrated with WordPress. WooCommerce turns your existing WordPress site into a customizable storefront capable of accepting payments, managing inventory, and facilitating sales tax and shipping calculations.
The plugin offers store owners an abundance of flexibility, features, and control over the look, feel, and functionality of their online store. This allows you to tailor the ecommerce experience to suit your brand and products. WooCommerce seamlessly integrates with WordPress while providing the core tools needed to manage and scale up an online store.
With WooCommerce, you have access to a vast collection of free and paid extensions that can enhance everything from payments to marketing and product management. Popular extensions include table rate shipping, subscription products, dynamic pricing, and advanced reporting.
This comprehensive guide will cover everything you need to know as a beginner about using WooCommerce for your WordPress website. You’ll learn how to set up and configure your online store, add products, process orders, customize the design, and use extensions to level up your ecommerce capabilities. With the flexibility of WordPress and power of WooCommerce, you have all the tools needed to create a successful online store.
Getting Started with WooCommerce
Installing and activating WooCommerce
The first step in setting up your WooCommerce store is installing and activating the plugin. This is a straightforward process that takes just a few minutes.
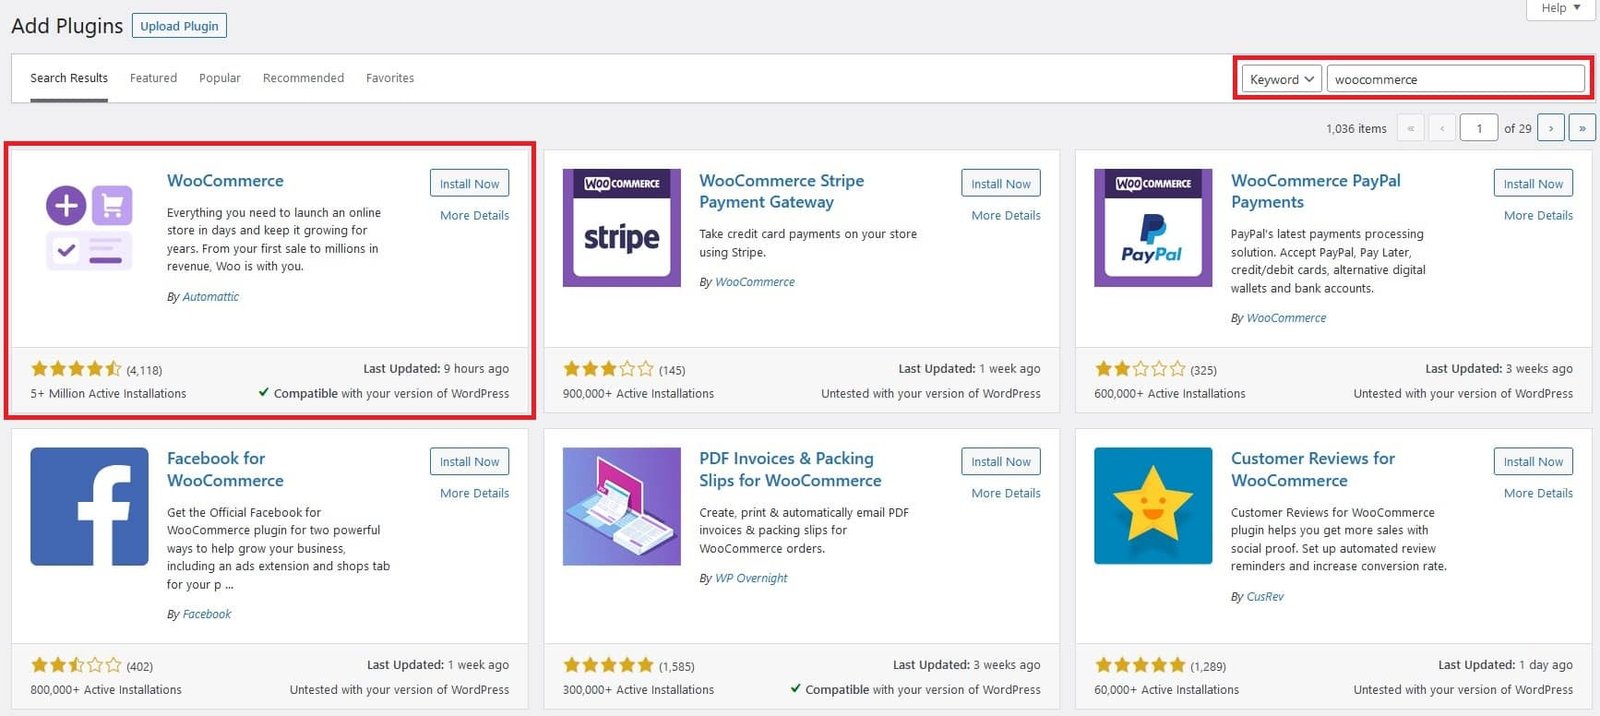
To get started, log into your WordPress dashboard and go to Plugins > Add New. Search for “WooCommerce” and click “Install Now” on the WooCommerce plugin. After installation, click “Activate” to turn on the plugin.
Once active, you’ll find a new WooCommerce menu in your WordPress dashboard. This is where you’ll access all the settings and options for your store going forward.
WooCommerce will walk you through some initial setup steps right after activation. You’ll be asked to enter your store’s location and product types you plan to sell. This information helps configure taxes, shipping, and other settings.
It’s important that WooCommerce is installed on a live WordPress site, rather than a local development environment. The plugin needs to be able to connect to WooCommerce services and your web server to function properly.
Take a few minutes to explore the WooCommerce dashboard menus and get familiar with key options like managing products, orders, and store settings. As the next sections will cover, you can dive right in to start setting up your store!
Activating WooCommerce is the first step to transforming your WordPress site into a powerful online store. With the plugin active, you’ll have access to all the tools necessary to customize, configure, and manage your store.
Setting up basic store settings like country, currency, etc.
Before you start adding products and taking orders, it’s important to configure some basic store settings in WooCommerce. This establishes key details for running your online store.
Some of the fundamental settings to define include:
Store Country – This sets the base country where your store operates from for tax and shipping purposes.
Currency – Choose the currency you will use for product pricing and transactions. Common options include USD, EUR, GBP, etc.
Products – Set your main product type (physical, virtual, or downloadable) and units of measurement. This helps sync inventory tracking.
Checkout Options – Determine checkout page behavior like allowing guest checkouts.
Account Creation – Choose whether customers need to create accounts to make purchases.
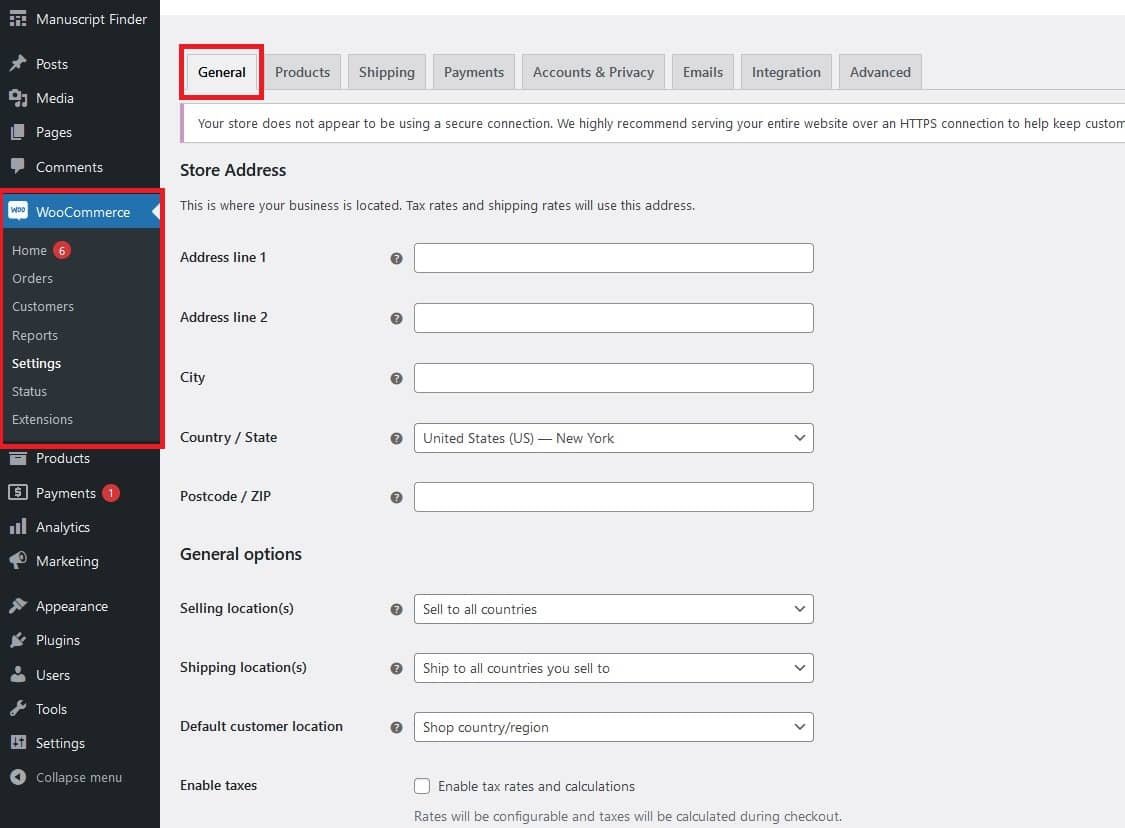
To configure these settings, go to WooCommerce > Settings > General. Update each section according to your business needs.
In the Currency Options section, you can enable multiple currencies if you want to show prices in different locations’ currencies. The Tax section is where you can configure automatic tax rate calculation by location.
Take time to review all general settings to ensure your store is compliant and optimized for your products and target customers. Things like store hours, Google reCAPTCHA, and store notice can also be configured.
Set these fundamental options first before moving on to other areas of setting up your WooCommerce store. Having the basics defined will ensure smoother store operations.
Configuring Tax and Shipping Options in WooCommerce
Taxes and shipping costs are essential elements of running an online store. WooCommerce provides flexible options to tailor these settings to your business model and locations you ship to.
Tax Setup
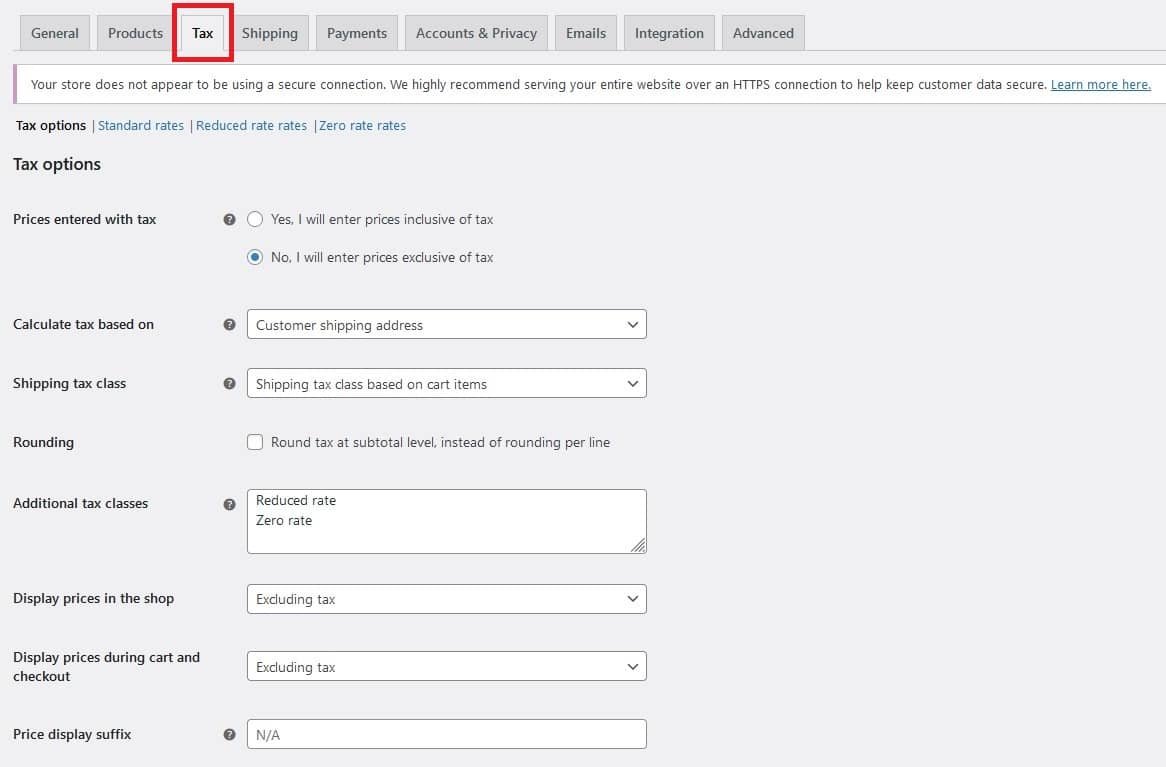
WooCommerce enables both automatic and manual tax calculation based on the store and customer location. Under WooCommerce > Settings > Tax, you can define tax rates and calculation rules.
Some key tax settings include:
- Tax calculations – Choose whether to calculate taxes automatically or enter rates manually.
- Tax display shop – Configure whether taxes are shown during checkout or after.
- Calculation rules – Set tax class rules like applying rates by customer address.
Shipping Setup
To define your shipping methods and costs:
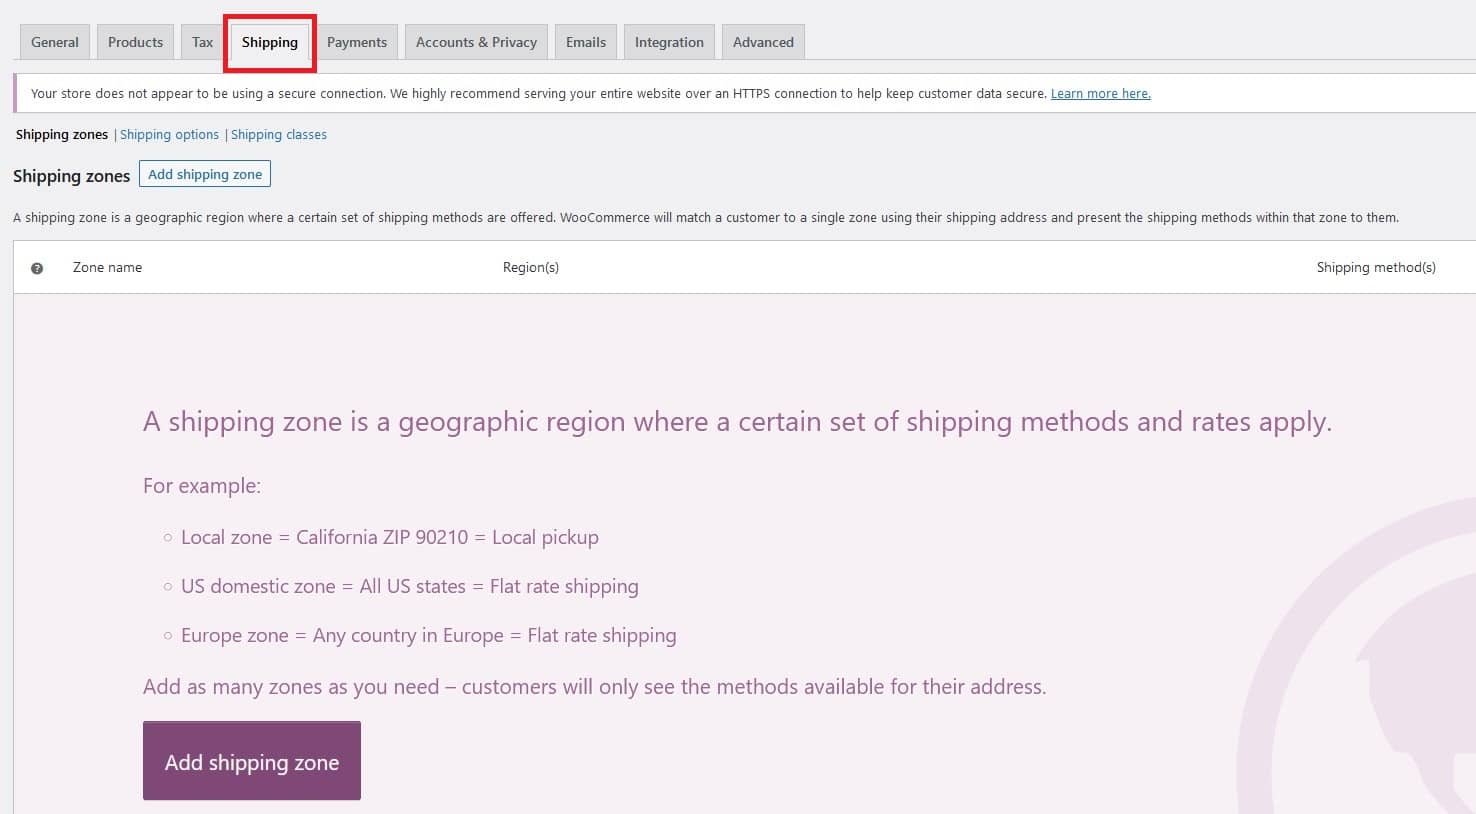
- Go to WooCommerce > Settings > Shipping
- Choose a shipping location zone
- Add your shipping method and associated rates
- Set free shipping rules if applicable
Common shipping options include flat rates, local pickup, and carrier integrations like UPS, FedEx, or USPS.
The plugins section in WordPress has many extensions for advanced shipping rules like table rates, shipping classes, and label printing.
Take time to test your tax and shipping settings to ensure accurate rates. Customers will abandon orders if unexpected costs appear at checkout, so properly configured taxes and shipping are musts.
Connecting payment gateways in WooCommerce
Payment gateways allow you to accept online payments from customers on your WooCommerce store. WooCommerce integrates with a wide range of popular gateways to give you flexibility.
Some top payment gateways used with WooCommerce include:
- PayPal – Accept credit cards and PayPal accounts.
- Stripe – Full-featured credit card payments with support for subscriptions.
- Authorize.Net – Accept one-time and recurring credit card transactions.
- Braintree – Owned by PayPal, processes credit and debit cards.
- Square – Take payments on websites and in person with Square hardware.

To add a gateway, go to WooCommerce > Settings > Payments. Select your desired gateway, enter your credentials, and enable it as your chosen payment method.
Make sure to test transactions thoroughly across currencies, card types, and scenarios. Pay close attention to factors like:
- Declined payments and retries
- Processing errors
- Refunds
- Subscription renewals
Having solid payment gateway integrations is crucial for an online store. Evaluate multiple options like PayPal and Stripe to determine the right fit your business model and customer base.
Enable just one payment gateway at first while testing your store. Once stable, you can enable multiple gateways and even offer customers a choice at checkout. Proper setup ensures smooth transactions and avoids issues down the road.
Creating Your Online Store With WooCommerce
Adding and Managing Products
The most essential component of any online store is its products catalog. WooCommerce makes it easy to add new products and manage existing ones.
Creating New Products
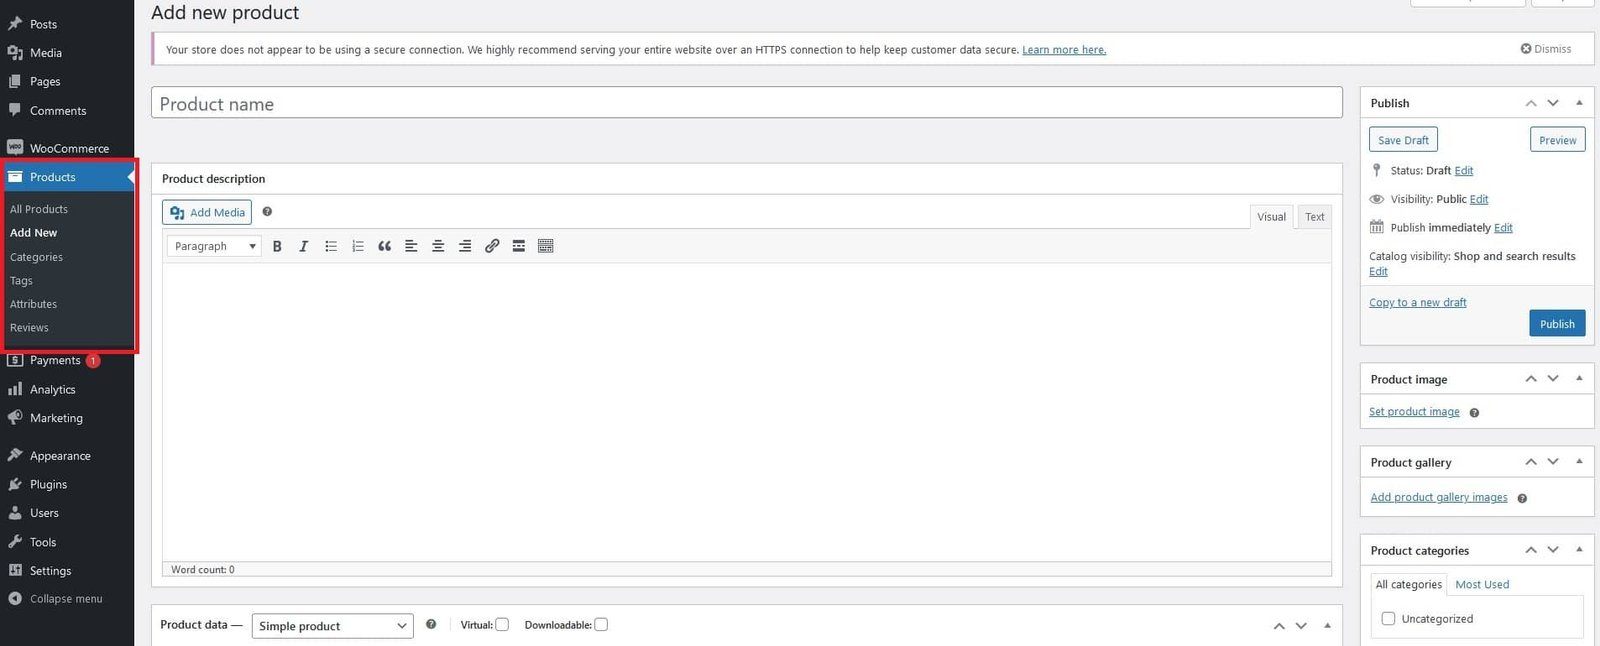
To add a new product:
- Go to Products > Add New
- Enter the product name and description
- Upload product images
- Configure pricing and inventory
- Set product category, tags, shipping class, etc.
- Publish the product
When adding products, be sure to provide detailed information like images, pricing, weight, dimensions, and descriptions. This benefits customers and also helps with order fulfillment.
Managing Products
The Products section in WooCommerce provides options to manage existing products:
- Edit product details if anything needs updating
- Adjust inventory counts as items sell
- Change pricing and enable promotions or sales
- Duplicate products to create variations
- Filter products by category or other taxonomy
Leverage the bulk edit tool to make changes across multiple products at once.
Third-party plugins also enhance product management with capabilities like bulk editing, cloning, advanced pricing, and import/export.
Carefully managing your products ensures your catalog stays up to date and buyers have the best experience.
Configuring product categories and tags in WooCommerce
Product categories and tags help organize your store’s products in a logical way to improve navigation and discovery for customers.
Product Categories
Categories segment products by type, collection, or product line. Common ecommerce categories include:
- Apparel
- Electronics
- Home Decor
- Books
- Toys
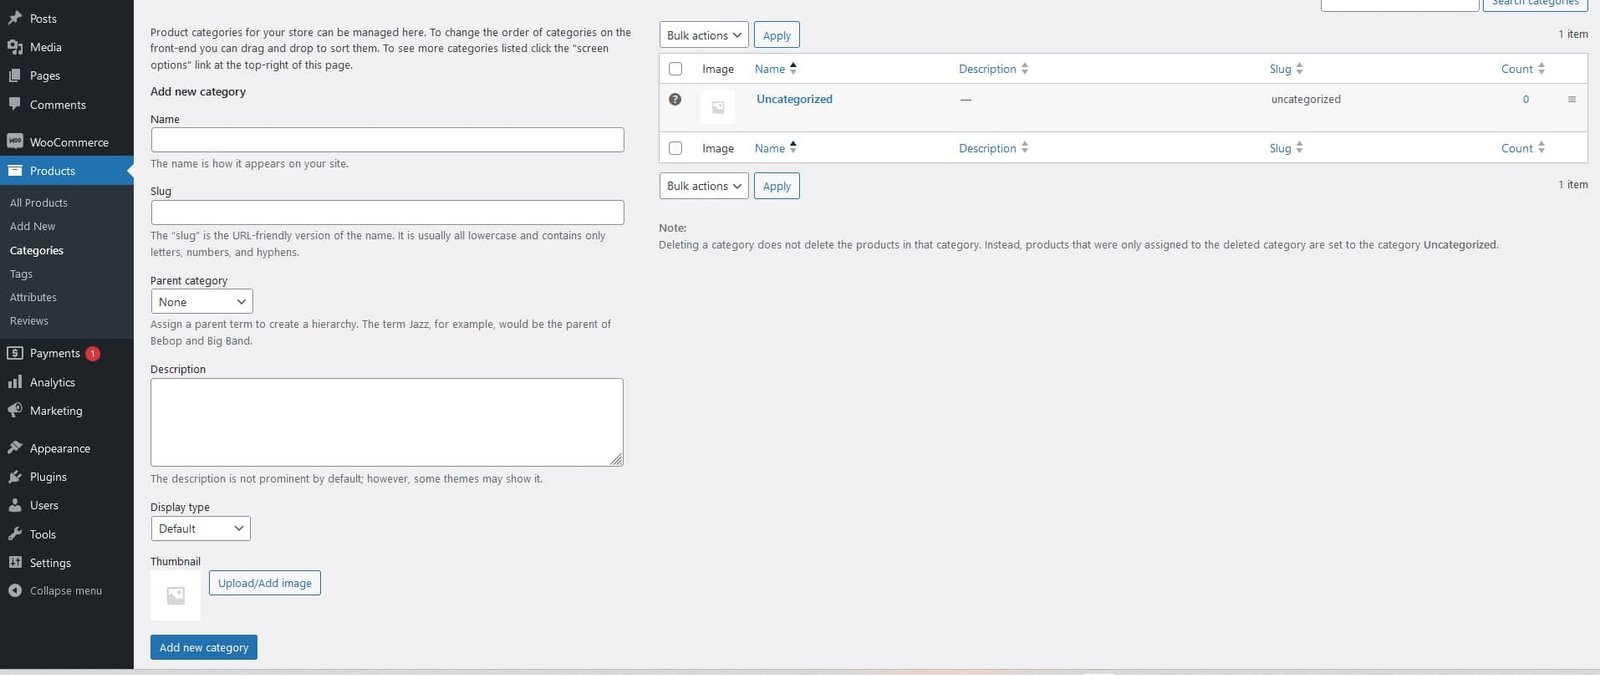
To add or edit a category:
- Go to Products > Categories
- Click Add New Category
- Give the category a name and optional parent category
- Set a category image if desired
- Click Add New Category
Well-structured categories make it easier for customers to browse products and find what they’re looking for.
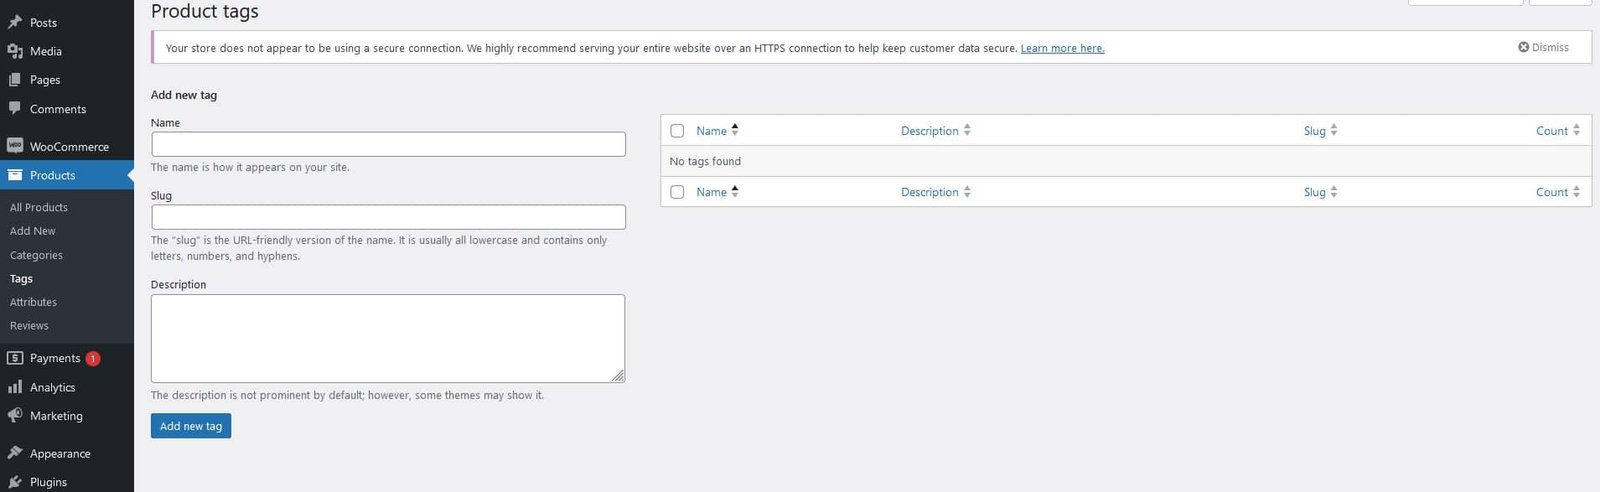
Product Tags
Tags are descriptive keywords that can be assigned to products for added organization and filtering. For example:
- Shirts -> Tags: cotton, short sleeve, casual
- Coffee Maker -> Tags: kitchen, appliances, black
Adding relevant tags helps connect products to related search terms. Tags aid product discovery.
Leverage both categories and tags to provide the optimal structure and organization for products. Consistent taxonomy improves the shopping experience and drives more sales.
Managing orders and inventory
As orders start rolling in to your WooCommerce store, you need to be able to handle key post-purchase tasks like tracking shipments and managing inventory.
Managing Orders
The orders section in WooCommerce provides insight into all purchases:
- View order details like products purchased, customer info, totals
- Update order status like processing, on-hold or completed
- Enter tracking numbers for shipments
- Send order communications and invoice to customer
- Mark orders as refunded
Efficient order management ensures customers are kept up-to-date on their purchase and receive items in a timely manner.
Managing Inventory
As physical product inventory is deducted with each order, you need to closely monitor stock levels. Important inventory management tasks include:
- Edit product inventory quantities
- Get low stock notifications
- Choose whether products can be oversold
- Sync online and in-store inventory counts
- Bulk update stock via CSV
The right WooCommerce plugins can also enable advanced inventory management based on warehouses, stock reservations, and more.
Closely tracking inventory and order status allows you to prevent overselling. This helps maintain trust and satisfaction from your customers.
Enabling coupons and discounts in WooCommerce
Offering coupons and promotional discounts is a great way to drive sales, encourage repeat purchases, and reward loyal customers. WooCommerce has built-in coupon management tools.
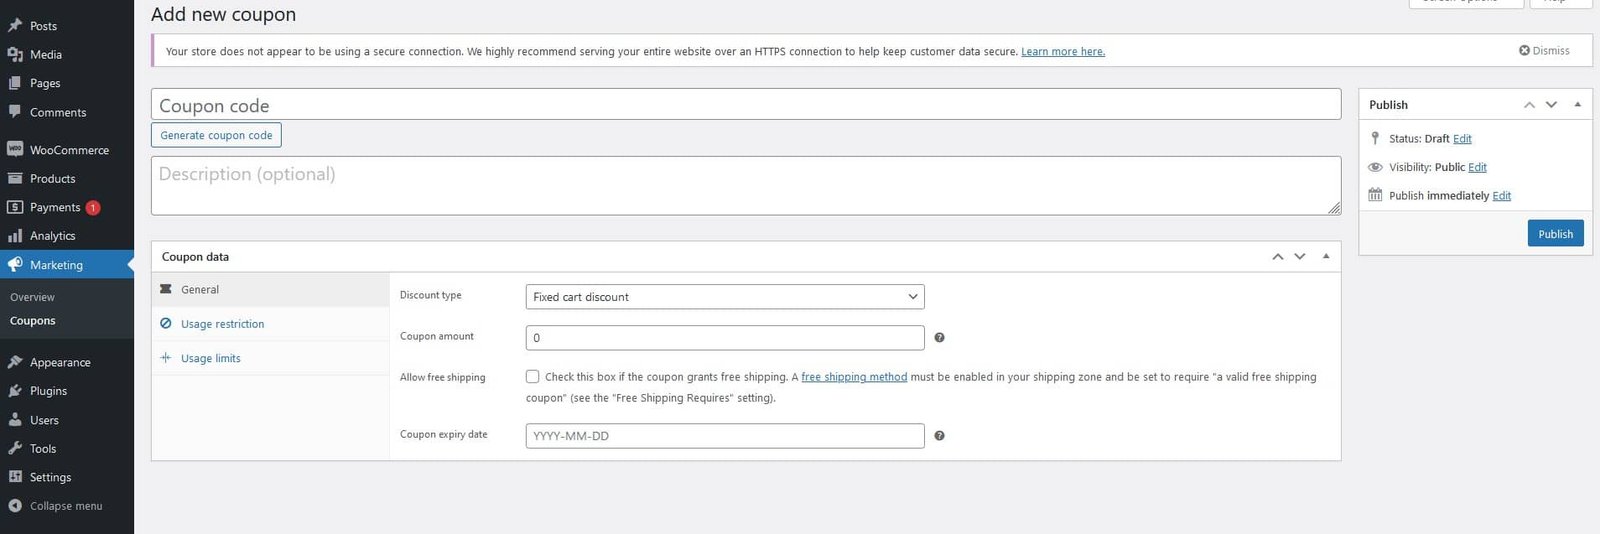
Creating Coupons
To set up a coupon:
- Go to Marketing > Coupons
- Click Add Coupon
- Enter coupon details like code, discount type and amount
- Set usage limits and expiration date
- Publish the coupon
Coupons can be restricted to certain products, categories, or customer emails. Usage limits control the number of redemptions.
The WooCommerce coupon generator makes it easy to create multiple coupons at once.
Promoting Discounts
There are a few ways customers can redeem discounts in your store:
- Enter coupon codes at checkout
- Click special discount links
- Automatically apply discounts for targeted customer segments
To display discounts more prominently, you can add banners, badges, or text on product pages. The Cart Notices extension helps highlight discount information at checkout.
Monitoring Usage
In the Coupons section, you can view details on coupon usage and redemptions over time. This helps you identify your most effective discounts.
Coupons are a great marketing asset. Take advantage of WooCommerce’s flexible options to create targeted promotions that drive sales and excite customers.
Customizing and Optimizing Your Store
Choosing a theme and tweaking the design
One of the advantages of using WooCommerce is the ability to customize your store’s design using WordPress themes. There are many free and paid themes options to choose from.
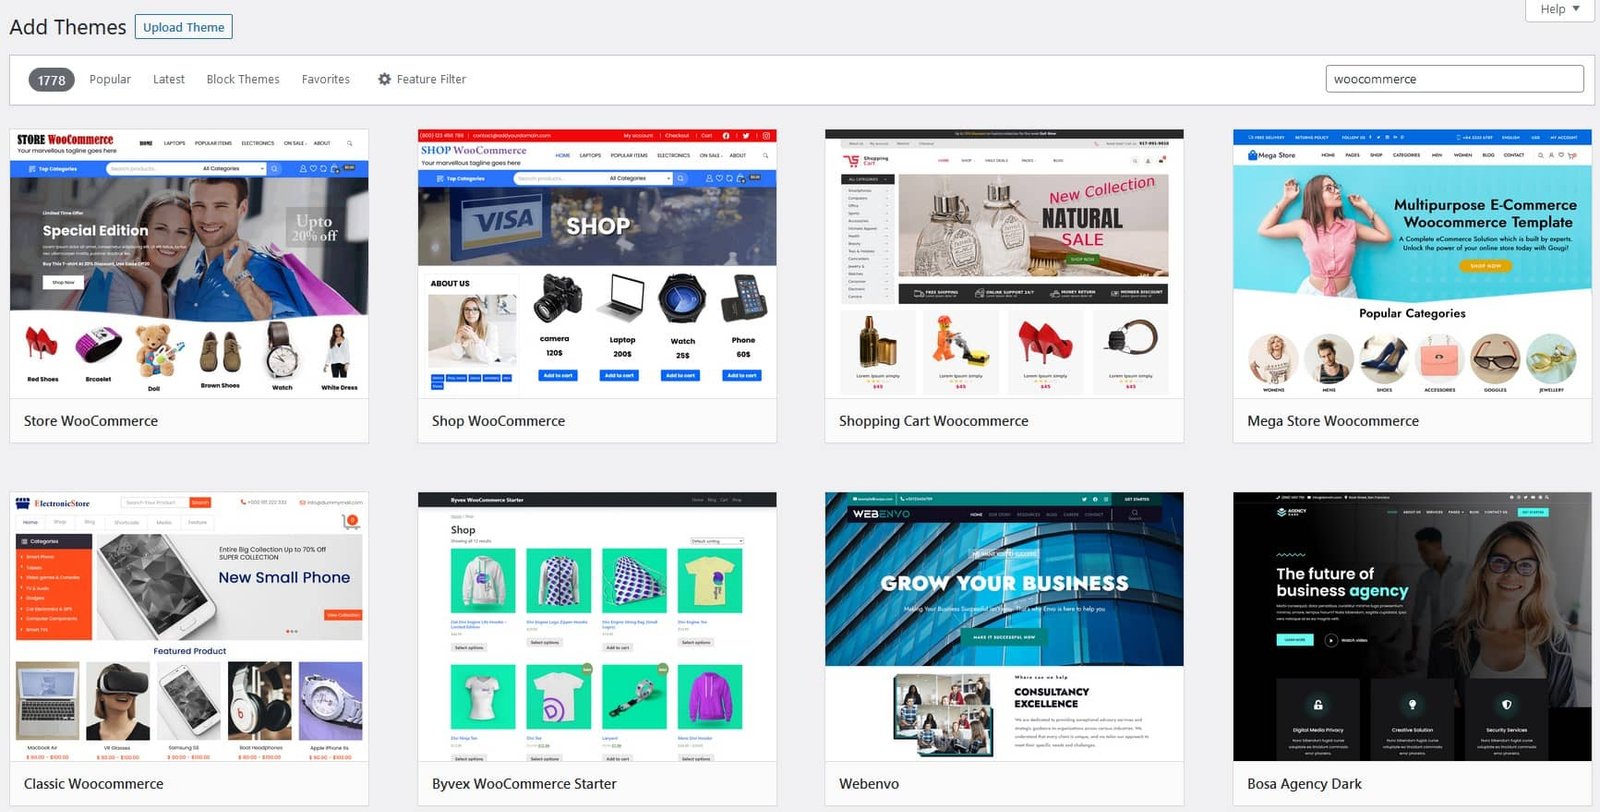
Choosing a Theme
When selecting a WooCommerce theme, look for:
- Responsiveness on mobile
- Speed and performance
- Features for showcasing products
- Flexible design customization
- Good documentation and support
Popular multipurpose themes like Storefront, Astra, and Genesis work well. There are also WooCommerce-specific themes like Flatsome, Divi, and Shopkeeper.
Tweaking the Design
To customize your theme design:
- Change colors, fonts, styles in the theme customizer
- Add your own logo and brand assets
- Configure homepage sections and product catalog layout
- Adjust page widths and spacing as needed
- Hide or show theme elements using hooks
Many themes have header builder tools and page layout managers to customize designs without coding.
Themes like Storefront are intentionally simple to allow extensive customization. Take time to tailor your theme to align with your brand style and store needs.
A well-designed theme creates a great first impression and shopping experience that builds loyalty and conversions.
Adding branding elements like logos and headers
Customizing the design in WooCommerce goes beyond just choosing a theme. You can incorporate branding assets like your logo, stylized headers, and custom graphics.
Adding Your Logo
To add your logo:
- Go to Customize > Site Identity
- Upload your logo file
- Set maximum height and width
- Choose whether to show a title and tagline
- Publish changes
For a crisp logo, use an SVG file or high-resolution image like PNG.
Styling Headers
Theme headers can be customized:
- Change header background color or image
- Adjust position and size of navigation menus
- Add secondary menu bars
- Incorporate banner headers and hero images
Check your theme’s header settings for customization options.
Custom Graphics
For unique brand styling, you can upload and use custom illustrations, product photos, icons, and banners:
- Homepage hero images or product photos
- Custom icons for contact pages, sales, etc.
- Stylized category or collection banners
- Illustrations for about pages or product guides
With your branding assets added, customize positions, sizes, and styling through the theme editor.
Consistent design elements like logos, headers, and graphics reinforce your brand identity. Don’t just rely on the default theme – add your unique branding touches.
Optimizing SEO for product pages in WooCommerce
Ensuring your products can be easily found in search engines like Google is key for visibility and driving organic traffic. WooCommerce offers SEO customizations for product pages.

Optimized Titles and Descriptions
Every product should have:
- Descriptive, keyword-rich titles
- Detailed meta descriptions summarizing the product
- Clear unique selling propositions
This content helps search engines understand the product and display attractive snippets.
Quality Images
Include multiple high-resolution product images with descriptive filenames and alt text. Images showcase products and improve click-through-rates.
Structured Data
WooCommerce can automatically generate and embed structured data that search engines can parse:
- Product name, description, price, ratings, etc.
- Brand, product identifiers, and hierarchy info
- Stock status, shipping info, customer reviews
This helps search ranking and presentation in results.
URLs
WooCommerce generates clean, descriptive URLs for products containing the product name, SKU, and categories.
Optimizing individual product pages boosts the entire site’s SEO. Be sure to also optimize the blog, archives, homepage, and other sections to cover all pages.
Enhancing navigation and menus
Clear site navigation is vital for guiding customers to the products and pages they want to visit. WooCommerce allows flexible customization of menus.
Menu Settings
In Appearance > Menus, you can:
- Create multiple menu locations like primary, footer, etc.
- Add pages, categories, products, or custom links
- Enable mega menus with sub-categories
- Adjust menu display per device size
- Set up category-specific menus
Consider organizing menus based on customer intent – like focusing on support pages for existing customers.
Navigation Plugins
Plugins extend menu functionality:
- Mega menus to highlight categories
- AJAX search for instant results
- Sticky menus that follow scrolling
- Hamburger menus for mobile
- Conditional menus that change by page
Test your navigation on desktop and mobile to ensure a seamless experience. Eliminate confusing or redundant menu items.
With robust menus, customers can easily browse and find products suited to their needs. This encourages more time spent exploring your store.
Setting Up Analytics and Reports
Gain valuable insights into your WooCommerce store’s performance using built-in analytics tools and reports.

Integrating Google Analytics
Google Analytics integration allows tracking key ecommerce metrics:
- Connect your Google Analytics account in the WooCommerce settings
- View store analytics like traffic sources, top pages, and conversions
- Segment data by product, category, user demographics and more
Google Analytics is free and provides in-depth reporting on customers.
WooCommerce Reports
Dive into store data using WooCommerce reports:
- Sales – Track sales, taxes, and top products over time.
- Stock – Monitor low inventory and product backorders.
- Downloads – Analyze downloadable product stats.
- Customers – View information on repeat customers and lifetime value.
The reports can be exported to Excel for further analysis.
There are also plugins for advanced reporting features like custom dashboards.
Analytics empower you to spot trends, identify opportunities, and make data-driven decisions for your store. Tracking key metrics right away is crucial.
Advanced Tips and Tricks For WooCommerce
Importing and exporting products
For stores with large catalogs, importing and exporting products in bulk saves time compared to manual data entry.
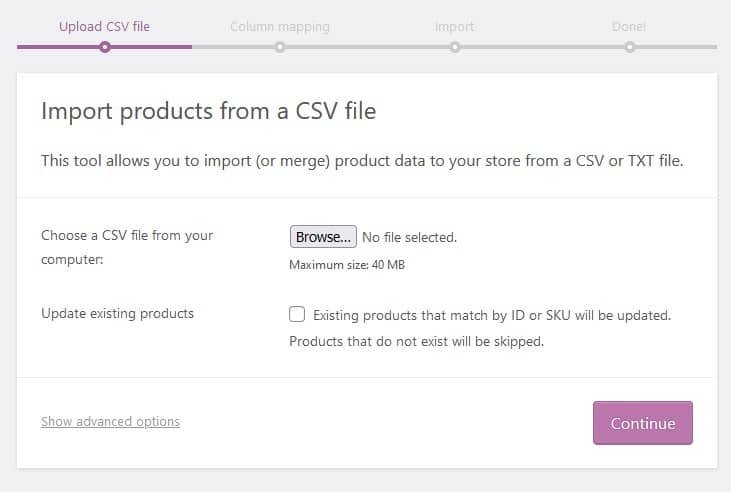
Importing Products
To import products:
- Go to Products > Import
- Upload a CSV file containing product details
- Map CSV columns to WooCommerce fields
- Run the import to add products to your store
Exports from ecommerce platforms or inventory management tools can be imported.
Exporting Products
To export products:
- Go to Products > Export
- Select the product fields to export
- Choose to download or export directly to a CSV
- Filter products by category, stock status, etc.
Exports help backup products or sync to accounting, ERP, or order management software.
The Import Export Plugin extends functionality with features like scheduled automation, image imports, and variable product support.
Leveraging imports and exports saves enormous time building catalogs. It also facilitates seamless syncing across tools in your ecommerce stack.
Managing multiple stores from one WordPress install
WooCommerce has built-in support for running multiple online stores from a single WordPress installation. This is useful for businesses with separate brands or locations.
Enable Multiple Stores
To activate multiple stores:
- Enable the WooCommerce Multisite feature
- Create a new site from the network admin
- Install WooCommerce on each additional site
Now you can access stores via separate dashboard URLs and domains.
Shared Resources
Some resources can be shared across stores:
- Products can sync across stores
- Single payment gateway for all stores
- Shared user accounts and roles
- Centralized reporting and analytics
This simplifies management of common resources.
Custom Per-Store Elements
But each store can still have its own:
- Store branding, theme, and design
- Categories and product galleries
- Shipping/tax settings and configuration
- Customers and orders
- Individual reporting and tracking
With strategic use of shared and individual elements, managing multiple stores via one WordPress install provides versatility and streamlined operations.
Finding and installing useful extensions and add-ons
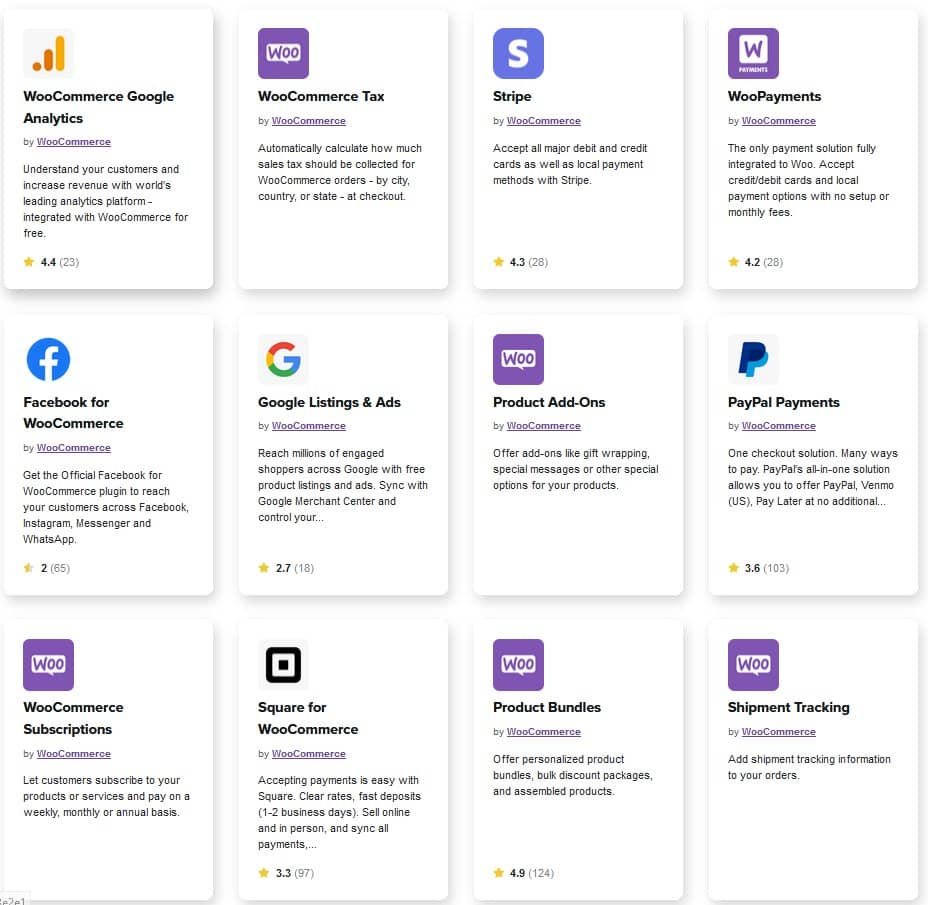
One of the major advantages of WooCommerce is the vast collection of extensions that enhance your store’s functionality. There are thousands of free and premium options.
Discovery and Research
Finding the right extensions involves:
- Browsing the collections on WooCommerce.com by category
- Searching the WordPress plugin directory
- Googling for recommendations on best plugins for specific needs
- Following WooCommerce news sites and communities
- Checking plugin compatibility and activity status
Read reviews and check ratings to evaluate extension quality before installing.
Installation
To install an extension:
- Purchase and download the plugin file if it’s paid.
- In your WordPress dashboard, go to Plugins > Add New.
- Upload or search for the plugin to install it.
- Activate the plugin.
- Configure any settings it adds.
Test extensions thoroughly before launching them live. Quality extensions enhance the store without slowing performance.
With the diverse range of extensions available, you can add almost any feature to your WooCommerce store. Carefully research to find the best options for your business needs.

Security and performance considerations
Running a secure, high-performance WooCommerce store should be a priority. There are several best practices to follow.
Security
Some key security tips:
- Install an SSL certificate to enable HTTPS across your store. Encrypt all traffic and data.
- Ensure your WordPress site and all plugins/themes are updated frequently. Updates often contain security patches.
- Use strong passwords, limit admin access, and enable two-factor authentication where possible.
- Backup your site regularly in case you need to restore after an attack.
- Avoid questionable plugins, limit custom code modifications, and sanitize all inputs.
- Use a web application firewall and security monitoring service to detect threats.
Performance
To optimize performance:
- Enable caching, content delivery networks (CDN), and image optimization.
- Compress and minify CSS, JavaScript, and HTML code.
- Lazy load non-critical resources like images below the fold.
- Review server configuration and specs – upgrade if needed.
- Analyze site speed regularly and address slow elements.
With ecommerce sites handling financial data, security and performance are both crucial elements. Invest in the proper tools and monitoring to maintain a well-protected, fast store.
Recommended Article: WordPress Security: Tips and Best Practices
Recap of why WooCommerce is a great ecommerce solution
WooCommerce is the most popular ecommerce platform for WordPress for good reason. It provides store owners with an unmatched combination of free open-source software, customizability, feature depth, and flexibility.
With WooCommerce, you can leverage WordPress’ existing strengths like SEO, content, and community while accessing enterprise-level ecommerce functionality. Whether you’re launching a small online business or building a huge catalog of products, WooCommerce is a solution that can scale.
The vast collection of themes and extensions allows limitless customization of your online storefront and customer experience. You retain full ownership and control over the technology, brand, and data powering your business.
From the initial product setup to accepting payments and fulfilling orders, WooCommerce makes the process intuitive through WordPress’ familiar dashboard. Ongoing maintenance is straightforward with automated updates and backups.
If you have an existing WordPress site, activating WooCommerce is an easy way to unlock commerce capabilities with minimal new investment. For those starting fresh, WooCommerce’s flexibility provides the ultimate blank slate to craft a store tailored precisely to your industry and offerings.
With robust capabilities suited to any business type paired with accessibility and ease-of-use, WooCommerce is the obvious choice for any WordPress user wanting to realize their ecommerce potential. The only limit is your imagination.
Additional resources for learning more
This guide covers the core fundamentals of getting started with WooCommerce. But there is always more to learn about maximizing this powerful ecommerce platform.
For further reading, some recommended resources include:
- WooCommerce Documentation – Official developer docs cover settings, workflows, and capabilities in-depth.
- WooCommerce Blog – Stay up to date with the latest news, trends, and tips from the WooCommerce team.
- WooCommerce Books – Books like WooCommerce Explained provide detailed visual references.
- WooCommerce Community – Join conversations with other users and get questions answered in the forums.
- WooCommerce Lessons – Free and paid online classes teach key skills through videos and exercises.
- Ecommerce Platform Reviews – Compare WooCommerce to alternatives like Shopify, Magento, and BigCommerce.
- Ecommerce Marketing Guides – Learn how to better promote products and attract customers.
- WooCommerce Extensions – Browse the thousands of extensions to enhance any aspect of your store.
With this initial starting guide and so many stellar resources out there, you have all the information needed to build a WooCommerce store that suits your exact needs.