Are you looking to enhance the functionality of your WordPress website? Look no further than WordPress plugins! These handy tools allow you to add new features and capabilities to your site with just a few clicks. Whether you’re looking to improve your site’s SEO, add social media sharing buttons, or create a custom contact form, there’s a WordPress plugin for that.
In this article, we’ll walk you through the process of installing a WordPress plugin step-by-step. We’ll cover everything from finding and choosing a plugin to activating and configuring it on your site. By the end of this guide, you’ll be a pro at installing WordPress plugins and taking your website to the next level.
So, let’s get started and learn how to install a WordPress plugin!
Finding and Choosing a Plugin
WordPress offers a vast library of plugins that can help you add new features and functionalities to your website. However, with so many options available, it can be challenging to find the right plugin for your needs. Here are some tips to help you find and choose the best WordPress plugin for your website:
- Determine Your Needs
Before you start searching for a plugin, it’s essential to determine what you need it for. Do you want to add a contact form to your site? Do you need to improve your site’s SEO? Do you want to add social media sharing buttons? Once you’ve identified your needs, you can start searching for plugins that meet those needs. - Check the Plugin Directory
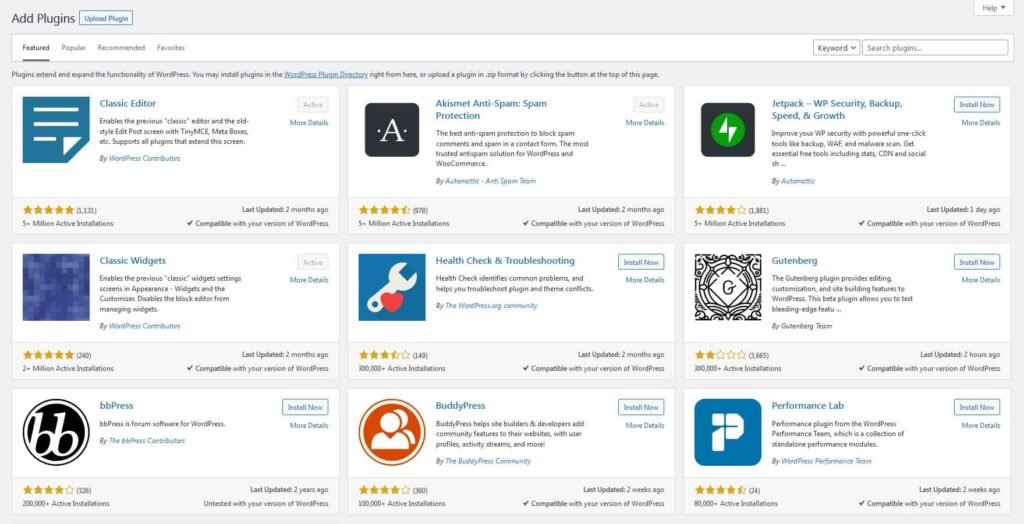
The WordPress Plugin Directory is the best place to start your search for a plugin. It’s a vast library of free and premium plugins that you can browse by category, popularity, and rating. You can also use the search bar to find plugins that match your specific needs.
When browsing the Plugin Directory, pay attention to the plugin’s rating, number of downloads, and reviews. These metrics can give you an idea of the plugin’s quality and popularity. - Read Reviews and Ratings
Reading reviews and ratings can help you determine whether a plugin is right for your needs. Look for plugins with high ratings and positive reviews. Pay attention to the reviews’ content and see if they mention any issues or limitations with the plugin. - Check Compatibility
Before installing a plugin, make sure it’s compatible with your WordPress version and other plugins you’re using. Incompatible plugins can cause conflicts and lead to site errors. - Consider Premium Plugins
While there are many free plugins available in the Plugin Directory, premium plugins can offer more advanced features and support. If you’re looking for a plugin with more advanced functionalities, consider investing in a premium plugin.
By following these tips, you can find and choose the best WordPress plugin for your website. Remember to always check the plugin’s compatibility, read reviews and ratings, and consider your needs before making a decision.
Installing a Plugin from the WordPress Plugin Directory
Installing a plugin from the WordPress Plugin Directory is a straightforward process that can be completed in just a few steps. Here’s how to do it:
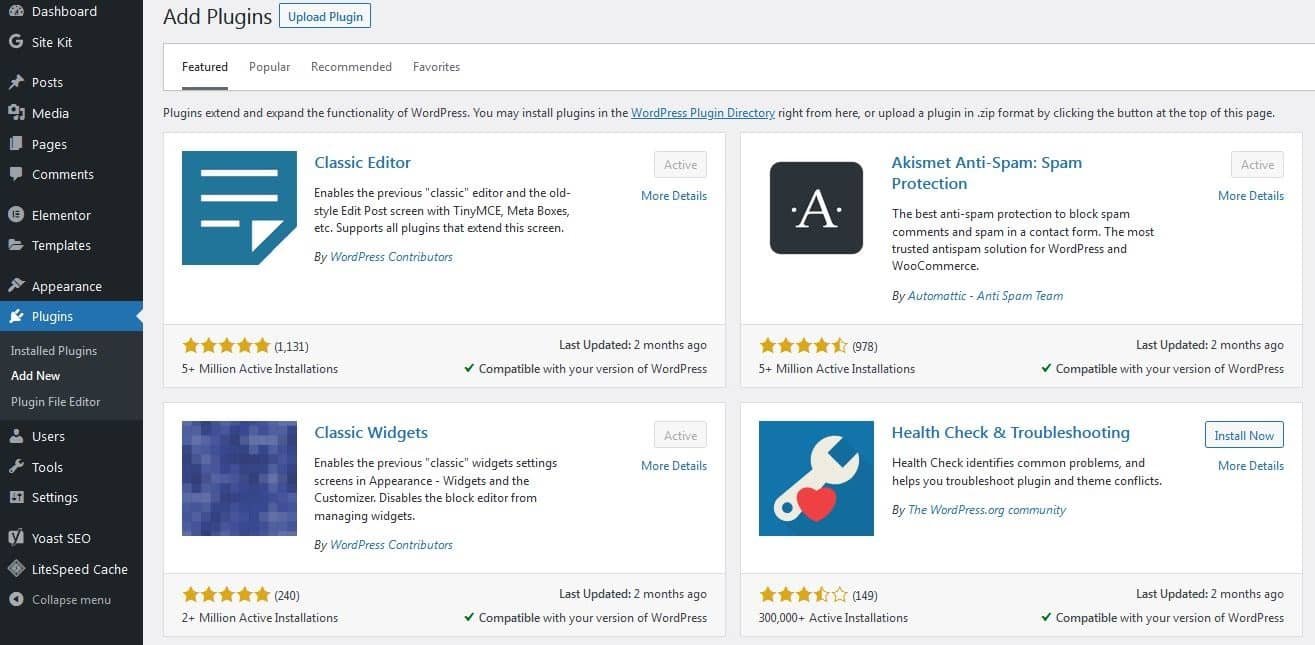
- Log in to Your WordPress Dashboard: To install a plugin, you need to log in to your WordPress dashboard. Once you’re logged in, navigate to the “Plugins” section on the left-hand side of the screen.
- Click “Add New”: In the “Plugins” section, click the “Add New” button at the top of the screen. will take you to the WordPress Plugin Directory.
- Search for a Plugin: Use the search bar to find the plugin you want to install. You can search by keyword, author, or plugin name. Once you’ve found the plugin you want to install, click the “Install Now” button.
- Activate the Plugin: After the plugin is installed, click the “Activate” button to activate it on your site. You can also click the “Return to Plugin Installer” button to install more plugins.
- Configure the Plugin: Once the plugin is activated, you can configure its settings to meet your needs. Depending on the plugin, you may need to add some information or customize its settings.
- Update the Plugin: It’s essential to keep your plugins up to date to ensure they’re working correctly and to avoid security vulnerabilities. To update a plugin, navigate to the “Plugins” section of your WordPress dashboard and click the “Update Now” button next to the plugin you want to update.
By following these steps, you can easily install a plugin from the WordPress Plugin Directory. Remember to always check the plugin’s compatibility and read reviews before installing it on your site.
Installing a Plugin from a Third-Party Source
In addition to the WordPress Plugin Directory, you can also install plugins from third-party sources. However, it’s essential to be cautious when installing plugins from outside sources, as they may not be safe or compatible with your site. Here’s how to install a plugin from a third-party source:

- Download the Plugin: To install a plugin from a third-party source, you first need to download the plugin file. You can usually find the plugin file on the source’s website or in an email from the plugin developer.
- Upload the Plugin: Once you’ve downloaded the plugin file, log in to your WordPress dashboard and navigate to the “Plugins” section. Click the “Add New” button at the top of the screen, then click the “Upload Plugin” button. Click the “Choose File” button and select the plugin file you downloaded. Click the “Install Now” button to upload the plugin to your site.
- Activate the Plugin: After the plugin is uploaded, click the “Activate” button to activate it on your site. You can also click the “Return to Plugin Installer” button to install more plugins.
- Configure the Plugin: Once the plugin is activated, you can configure its settings to meet your needs. Depending on the plugin, you may need to add some information or customize its settings.
- Update the Plugin: It’s essential to keep your plugins up to date to ensure they’re working correctly and to avoid security vulnerabilities. To update a plugin, navigate to the “Plugins” section of your WordPress dashboard and click the “Update Now” button next to the plugin you want to update.
When installing a plugin from a third-party source, it’s crucial to ensure that the plugin is safe and compatible with your site. Before installing a plugin, research the developer and read reviews to ensure that the plugin is reputable and reliable. Additionally, always keep your plugins up to date to ensure they’re working correctly and to avoid security vulnerabilities.
By following these steps, you can install a plugin from a third-party source and enhance the functionality of your WordPress site.

Activating and Configuring a Plugin
After you’ve installed a plugin, you need to activate it and configure its settings to meet your needs. Here’s how to activate and configure a plugin on your WordPress site:
- Activate the Plugin: To activate a plugin, navigate to the “Plugins” section of your WordPress dashboard and find the plugin you want to activate. Click the “Activate” button next to the plugin to activate it on your site.
- Access the Plugin Settings: Once the plugin is activated, you can access its settings by clicking the “Settings” link next to the plugin in the “Plugins” section. Depending on the plugin, you may need to access its settings from a different location, such as the “Appearance” or “Tools” section.
- Configure the Plugin Settings: In the plugin settings, you can configure the plugin’s settings to meet your needs. Depending on the plugin, you may need to add some information or customize its settings. For example, if you’re installing an SEO plugin, you may need to add your site’s meta description and keywords.
- Save the Changes: After you’ve configured the plugin settings, click the “Save Changes” button to save your changes. Some plugins may require you to click a different button, such as “Update” or “Apply”.
- Test the Plugin: After you’ve configured the plugin settings, it’s essential to test the plugin to ensure it’s working correctly. Depending on the plugin, you may need to test it by visiting your site or using a testing tool.
By following these steps, you can activate and configure a plugin on your WordPress site. Remember to always check the plugin’s compatibility and read reviews before installing it on your site. Additionally, keep your plugins up to date to ensure they’re working correctly and to avoid security vulnerabilities.

Troubleshooting Common Issues
While installing and configuring a plugin is usually a straightforward process, sometimes issues can arise. Here are some common issues you may encounter when installing a WordPress plugin and how to troubleshoot them:
Plugin Conflicts
Sometimes, plugins can conflict with each other, causing errors or site crashes. If you’re experiencing issues after installing a new plugin, try deactivating other plugins one by one to see if the issue is resolved. If the issue is resolved after deactivating a specific plugin, that plugin may be conflicting with the new plugin.
Compatibility Issues
Plugins may not be compatible with your WordPress version or other plugins you’re using. Before installing a plugin, check its compatibility with your WordPress version and other plugins. If you’re experiencing issues after installing a new plugin, try deactivating other plugins one by one to see if the issue is resolved.
Plugin Errors
Sometimes, plugins can cause errors or site crashes. If you’re experiencing issues after installing a new plugin, try deactivating the plugin to see if the issue is resolved. If the issue is resolved after deactivating the plugin, the plugin may be causing the error.
Outdated Plugins
Outdated plugins can cause security vulnerabilities and site errors. Always keep your plugins up to date to ensure they’re working correctly and to avoid security vulnerabilities. To update a plugin, navigate to the “Plugins” section of your WordPress dashboard and click the “Update Now” button next to the plugin you want to update.
Plugin Not Working as Expected
If a plugin isn’t working as expected, check its settings to ensure they’re configured correctly. If the settings are correct, try deactivating and reactivating the plugin to see if the issue is resolved. If the issue persists, contact the plugin developer for support.
By following these troubleshooting tips, you can resolve common issues when installing and configuring WordPress plugins. Remember to always check the plugin’s compatibility and read reviews before installing it on your site. Additionally, keep your plugins up to date to ensure they’re working correctly and to avoid security vulnerabilities.
Conclusion
WordPress plugins are a powerful tool that can help you enhance the functionality of your website. Whether you’re looking to improve your site’s SEO, add social media sharing buttons, or create a custom contact form, there’s a WordPress plugin for that.
In this article, we’ve walked you through the process of installing and configuring a WordPress plugin step-by-step. We’ve covered everything from finding and choosing a plugin to troubleshooting common issues. By following these steps, you can easily install and configure a plugin on your WordPress site and take your website to the next level.
Remember to always check the plugin’s compatibility and read reviews before installing it on your site. Additionally, keep your plugins up to date to ensure they’re working correctly and to avoid security vulnerabilities.
We hope this guide has been helpful in your journey to enhance your WordPress site’s functionality. If you have any questions or comments, feel free to leave them below.